How to Build an Automatic Gardening System Using Arduino, Relay, Soil Moisture Sensor & Water Pump
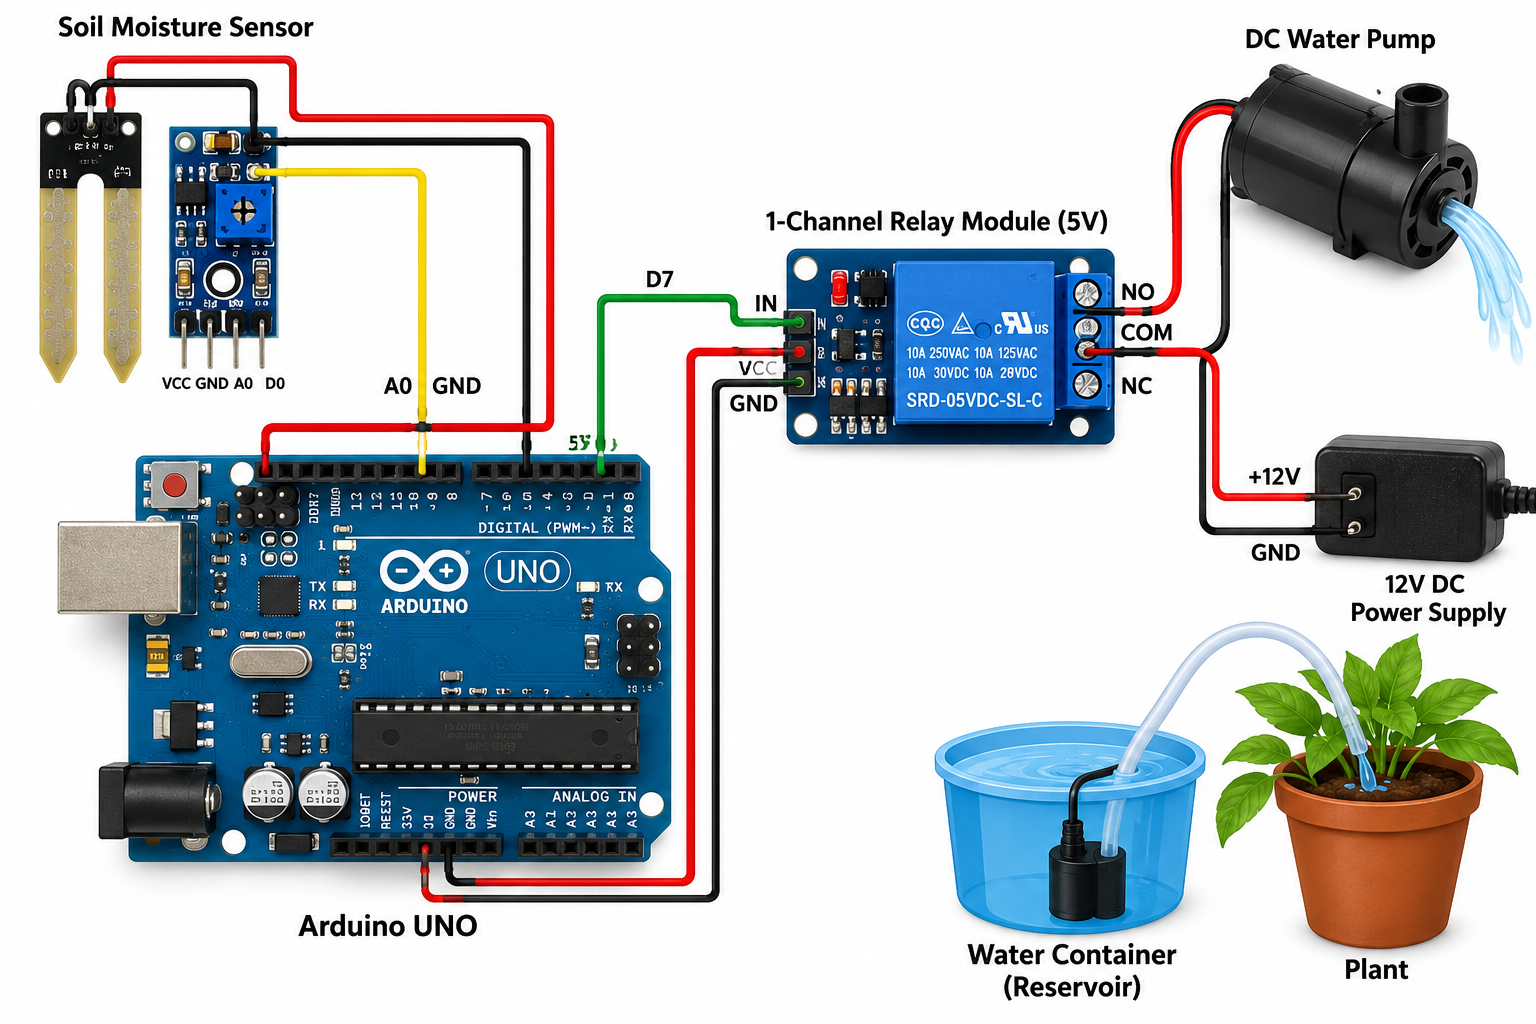
Imagine having a small garden that automatically waters itself whenever the soil becomes dry.
You don’t need to remember to water your plants every morning or worry about your plants when
you are away for a few days.
In this DIY project, we will build a simple automatic plant watering system using Arduino.
The system uses a soil moisture sensor to check the condition of the soil. When the soil becomes
too dry, Arduino activates a relay, which switches ON a water pump. Once enough moisture is
detected, the pump can be switched OFF.
This project is suitable for balconies, terraces, kitchen gardens, indoor plants, small vegetable
gardens and electronics hobby projects.
🌱 How Does an Automatic Gardening System Work?
The basic idea is very simple:
- The soil moisture sensor is placed inside the soil.
- The sensor measures the moisture level.
- Arduino reads the sensor value.
- Arduino compares the reading with a predefined threshold.
- If the soil is dry, Arduino activates the relay.
- The relay switches ON the water pump.
- Water is delivered to the plant through a small pipe.
- When the soil becomes sufficiently wet, Arduino switches the pump OFF.
The complete process can be represented as:
Soil Sensor → Arduino → Relay → Water Pump → Plant
🛒 Components Required
You don’t need expensive equipment to build this project. Most of the components are commonly
available online.
1. Arduino UNO
Arduino UNO is the brain of the system. It reads the soil moisture sensor and controls the relay
according to the programmed conditions.
What to look for: Arduino UNO R3 or a compatible UNO board.
An Arduino Uno Rev3 is currently available through Amazon.in listings, although the exact seller
and price may change over time.
2. Soil Moisture Sensor
The soil moisture sensor is one of the most important parts of the project. It detects how wet or
dry the soil is and sends an electrical signal to Arduino.
For a basic project, you can use an analog soil moisture sensor. Insert the sensor into the soil
near the plant, but avoid placing it directly against the plant’s roots.
Tip: Capacitive soil moisture sensors are often preferable for longer-term
projects because they don’t rely on exposed metal probes in the same way as basic resistive
sensors.
3. 5V Relay Module
Arduino itself should not be used to directly power a water pump. The relay acts as an electrically
controlled switch between the Arduino and the pump circuit.
When Arduino sends a control signal, the relay changes state and allows power to reach the pump.
For this project, a 1-channel 5V relay module is sufficient because we are controlling one pump.
4. DC Water Pump
The water pump moves water from a container or reservoir to the plant.
For a beginner project, a small low-voltage DC pump is a convenient choice.
Make sure the pump voltage matches the power supply you choose.
Important: Do not select a pump only because it is cheap. Check its operating
voltage, current requirement, flow rate and maximum pumping height.
5. Power Supply
The pump requires its own suitable power source. A common approach is to use a low-voltage DC
pump together with a suitable DC power adapter.
Never connect a pump to a power supply unless the voltage and current specifications are
compatible with the pump.
6. Jumper Wires
Jumper wires are useful for connecting the Arduino, sensor and relay module during testing.
📦 Complete Components List
| Component | Purpose |
|---|---|
| Arduino UNO | Controls the complete system |
| Soil Moisture Sensor | Detects soil moisture |
| 5V Relay Module | Switches the pump |
| DC Water Pump | Moves water to the plant |
| DC Power Supply | Provides power to the pump |
| Jumper Wires | Electrical connections |
| Water Pipe | Delivers water to the plant |
| Water Container | Stores water |
🔌 Basic Circuit Connections
The following is a simple example of how the Arduino side can be connected.
Soil Moisture Sensor → Arduino
| Sensor Pin | Arduino |
|---|---|
| VCC | 5V |
| GND | GND |
| AOUT | A0 |
Relay Module → Arduino
| Relay Pin | Arduino |
|---|---|
| VCC | 5V |
| GND | GND |
| IN | Digital Pin 7 |
The pump should be connected through the relay’s switching contacts and powered by an
appropriate external supply. Do not attempt to power a pump directly from an Arduino GPIO pin.
⚙️ How the Relay Controls the Pump
The relay is essentially an electrically controlled switch.
Arduino controls the relay’s input. The relay then switches the separate pump circuit.
This arrangement allows the low-power Arduino control circuit to operate a pump that requires
more current than an Arduino output can provide.
For a typical low-voltage DC setup:
DC Power Supply → Relay Contact → Pump → DC Power Supply
The Arduino controls the relay input rather than supplying the pump’s operating current.
💻 Arduino Code for Automatic Plant Watering
Upload the following basic program to the Arduino UNO:
const int moisturePin = A0;
const int relayPin = 7;

// Adjust this value after testing your sensor
const int dryThreshold = 600;

void setup() {
  Serial.begin(9600);

  pinMode(relayPin, OUTPUT);

  // Pump OFF at startup
  digitalWrite(relayPin, HIGH);
}

void loop() {

  int moistureValue = analogRead(moisturePin);

  Serial.print("Soil Moisture Value: ");
  Serial.println(moistureValue);

  if (moistureValue > dryThreshold) {

    // Soil is dry
    digitalWrite(relayPin, LOW);

    Serial.println("Soil is dry - Pump ON");

  } else {

    // Soil has enough moisture
    digitalWrite(relayPin, HIGH);

    Serial.println("Soil is wet - Pump OFF");
  }

  delay(2000);
}
🧪 Important: Calibrate the Soil Sensor
The value 600 in the example code is not a universal moisture value.
Different sensors, soil types and sensor positions can produce different readings.
Before connecting the pump, test the sensor first.
Step 1: Test the sensor in dry soil
Place the sensor in relatively dry soil and note the value displayed in the Serial Monitor.
Step 2: Test the sensor in wet soil
Water the soil and check the new reading.
Step 3: Choose a threshold
Choose a value somewhere between your dry and adequately moist readings.
For example, if your readings are approximately:
- Dry soil: 750
- Moderately moist soil: 550
- Wet soil: 350
You could start testing with a threshold around 600 and adjust it according to the plant and
soil conditions.
💧 Add a Water Reservoir
Instead of connecting the pump to a household water line, beginners can use a small water
container as a reservoir.
Place the pump inside the container and connect a small tube to the pump outlet.
The other end of the tube can be positioned near the plant.
This creates a simple closed watering system:
Water Container → Pump → Tube → Plant
🌿 How to Improve the System
1. Add a Water-Level Sensor
One useful upgrade is a water-level sensor. It can prevent the pump from running when the
reservoir is empty.
2. Add an LCD Display
An LCD can display the current soil moisture reading and pump status.
For example:
Soil Moisture: 48%
Pump: OFF
3. Add Multiple Plants
You can expand the system by using multiple moisture sensors and separate irrigation lines.
For more advanced systems, multiple relay channels or MOSFET-based switching can be used.
4. Add a Real-Time Clock
A real-time clock module can allow watering rules based on time as well as soil moisture.
5. Add Wi-Fi Control
For a smarter garden, replace or supplement the Arduino UNO with an ESP32 or ESP8266.
This can allow you to monitor sensor readings remotely and control the irrigation system through
a web interface or mobile application.
6. Add Solar Power
A small solar-powered system can be developed for gardens where running a mains power cable is
not convenient. This requires proper battery charging and power management rather than connecting
a solar panel directly to the pump.
🌱 Plants That Can Benefit From Automated Watering
- Tomato plants
- Chilli plants
- Coriander
- Mint
- Basil
- Spinach
- Flower plants
- Indoor plants
- Balcony vegetable gardens
- Small terrace gardens
However, not every plant needs the same amount of water. The threshold and watering duration
should be adjusted according to the plant, soil, container size, temperature and weather.
⚠️ Important Safety Precautions
- Do not connect a pump directly to an Arduino digital pin.
- Use a suitable external power supply for the pump.
- Make sure the pump voltage matches the power supply.
- Keep water away from exposed electronics.
- Use a suitable enclosure for the Arduino and relay when installing the system outdoors.
- Disconnect power before changing wiring.
- Do not use mains electricity near water unless the installation is designed and protected by a qualified professional.
- Use appropriate electrical protection for the final installation.
💰 Is an Automatic Gardening System Expensive?
A basic system can be built relatively inexpensively because Arduino-compatible boards, relay
modules, sensors and small pumps are widely available.
The final cost depends on the quality of the Arduino board, type of moisture sensor, pump,
power supply, tubing and enclosure you select.
Rather than choosing the cheapest component, pay particular attention to the pump’s electrical
specifications and the reliability of the sensor.
🔧 Common Problems and Solutions
Problem 1: Pump never turns ON
Check the relay input, pump power supply, relay logic and wiring. Some relay modules are
active LOW, meaning the relay turns ON when the Arduino output is LOW.
Problem 2: Pump is always ON
Your sensor threshold may be incorrect or the relay logic may be reversed. Check the Serial
Monitor and determine whether your sensor produces higher readings in dry soil or wet soil.
Problem 3: Arduino resets when the pump starts
This can happen because of electrical noise or an inadequate power arrangement. Use an appropriate
separate supply for the pump and make sure the wiring and grounding are properly designed.
Problem 4: Sensor readings keep changing
Sensor readings can fluctuate because of soil conditions, electrical noise and sensor placement.
You can average multiple readings in software instead of reacting to one reading.
Problem 5: Plant receives too much water
Do not simply keep the pump running until the sensor changes significantly. A better system can
use a maximum pump runtime, a cooldown period and moisture hysteresis.
🚀 A Better Version: Smart Automatic Irrigation
Once the basic project is working, you can make it much more intelligent.
A more advanced system could use:
- Capacitive soil moisture sensors
- ESP32 Wi-Fi controller
- Water-level sensor
- Temperature and humidity sensor
- Multiple irrigation zones
- Drip irrigation tubing
- OLED or LCD display
- Mobile notifications
- Weather-based watering rules
- Solar power
Instead of simply asking “Is the soil dry?”, the system could eventually consider multiple
conditions before watering.
📌 Final Thoughts
An Arduino-based automatic gardening system is an excellent beginner electronics project because
it combines programming, sensors, automation and real-world hardware.
The basic concept is easy to understand:
measure the soil → make a decision → switch the pump → water the plant.
Once you understand this basic setup, you can continue adding features such as Wi-Fi monitoring,
multiple plants, water-level detection, solar power and mobile notifications.
It can also be a useful starting point for building a more advanced smart irrigation system for
a balcony, terrace or home garden.
🛒 Recommended Components
You can add your Amazon affiliate links below. Always check the current specifications and
compatibility before purchasing.
- Arduino UNO R3 – Add your Amazon affiliate link
- 5V 1-Channel Relay Module – Add your Amazon affiliate link
- Soil Moisture Sensor – Add your Amazon affiliate link
- DC Water Pump – Add your Amazon affiliate link
- Suitable DC Power Supply – Add your Amazon affiliate link
- Jumper Wires – Add your Amazon affiliate link
- Water Pipe / Drip Irrigation Tube – Add your Amazon affiliate link
- Water Storage Container – Add your Amazon affiliate link